Showing posts with label projects. Show all posts

Thursday, November 01, 2012

Another hat

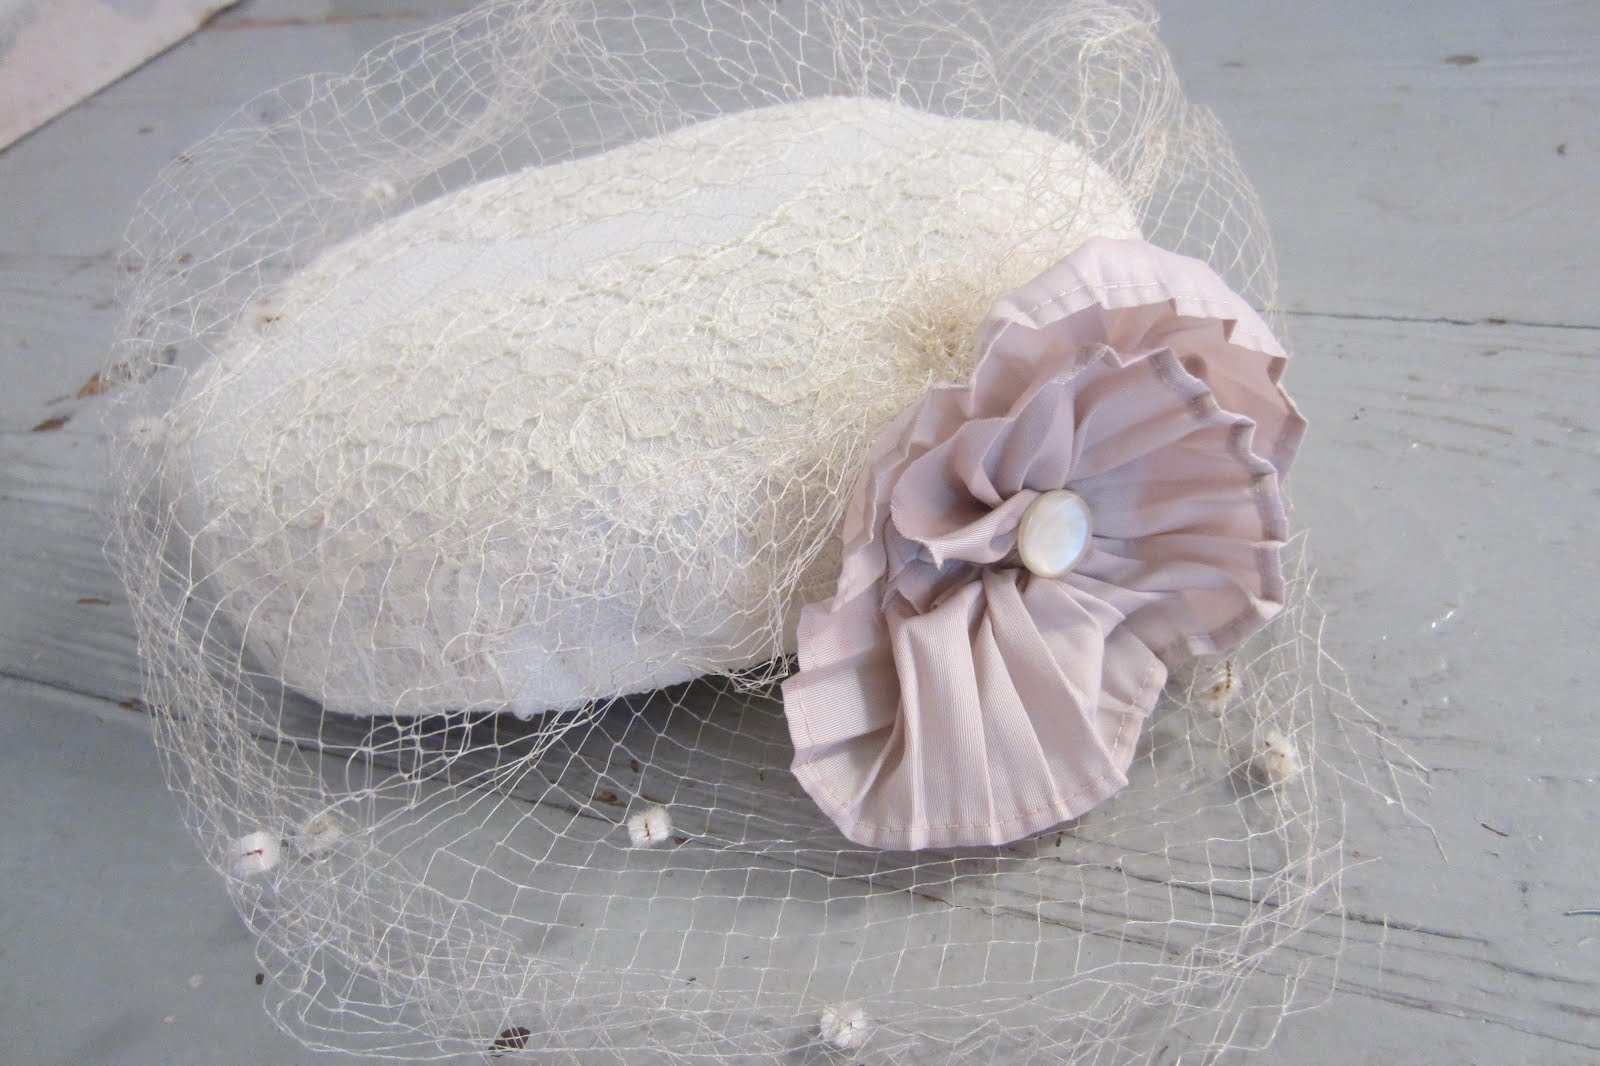
 Today I heard we are going to a 1920s themed cocktail party.  I made a hat.


Unfortunately, like all my hats, it turned out very 1950s.  I don't think they were actually wearing hats at cocktail parties in the 1920s.  I'm not sure how to pull off an actual 20s look without bobbed hair or those weird side-buns.


Sunday, October 14, 2012

Project: story stones

There are lots of kids' things I realize I won't have time to make when I'm actually a parent. So I'm making them now. The latest project: story stones. They're a starting point for kids to make up stories about the items pictured.


I chose a mix of fanciful items (hot air balloon) and ones that I expect my kids will see often (tree, Red Line train). Once I have actual kids I'll probably make more to suit their interests.


I made the pictures from cut-out bits of magazine paper attached with watered-down Elmer's glue. They're pleasant in the hand.

Friday, May 11, 2012

Project: vest

Sea-green velveteen: check.
Free afternoon: check.


Temporary unemployment is pretty great.

Wednesday, May 09, 2012

Project: hula hoops for grownups

A few months ago I saw an amateur circus troupe in Davis Square. There was a woman dancing with a hula hoop, a bigger one than kids use. She let me try it, and it was a lot easier to use than the kid-sized ones. It was heavier, too. She told me you could make them from plastic tubing, and yesterday that's what I did.


Following these instructions, I used 3/4 inc irrigation tubing and connectors. I guess they make special pipe clippers, but I used a hacksaw. I made a fabric tube, which you have to put on before sealing up the ends. I poured about a cup of water in for extra weight. I soaked the ends of the pipe in hot water for about 30 seconds before jamming them onto the connector piece.

It's not as easy to use as I remember hers being. Mine comes up to mid-chest level on me, and I think hers might have been bigger. I have plenty more tubing, so maybe next time I'll try a bigger hoop.


Then Jeff came home and tried using one while standing on the kitchen table, which he will not be doing again.

Thursday, May 03, 2012

Project: clothespin bag

I am done with grad school! Which means I get to spend the next week watching movies and making stuff. Like this clothespin bag.


I made the frame from a coathanger. It's a circle with a rectangle sticking out, and then the rectangle bent double over the back of a chair so it hooks over a clothesline, like so. Except I forgot that clotheslines are pretty high, so this bag hangs too high to comfortably reach into.

If I were doing it over, I would have extended the rectangle by at least a foot so the bag hangs well down below the line. This might have needed a bigger coathanger, or maybe two coathangers.

The bag is basically a cylinder: one rectangle of cloth sewn into a tube, and then a circle of cloth at the bottom. Then I sewed the upper edge of the cylinder to the wire hoop.

Thursday, April 12, 2012

Child things

I'm not entirely sure if Jeff and I should have kids. I've seen the evidence that parents are less happy than non-parents. I understand that I'm the product of many, many generations of mammals that successfully reproduced, and that we are all selected to be good at parenting. And I understand that evolution does not have my personal interests at heart, and that it may have bred me to want something that will not actually make me happy.

But boy, do I want it.

Any actual babies need to wait until I've finished school and have had a job long enough to get medical leave. So in the mean time, I'm sewing stuff.

A mouse in an Altoid tin bed, from this idea.


A marble maze, from this idea.


And a Waldorf-style weighted doll.


(Watching a woman and her 10-year-old grandson at the bus stop the other day gave me food for thought. They were cursing at each other, threatening to knock each other into traffic. At one point she rounded on me and said, "You have kids? Don't have none!" I gave her a half-smile and thought, "I bet the findings on parental happiness are dragged down by people with terrible parenting skills. I'm sure I can do better than this.")

Saturday, April 07, 2012

Project: Easter hat

A few weeks ago I thrifted a pink taffeta party dress with an unfortunate frill down the front. I ripped off the frill, made it into some flowers for the bodice, and it's now ready for dancing.

I decided this dress could also make an appearance at Easter, and having leftover fabric from the frill meant I could make a matching hat. There are few occasions in modern life to wear a fancy hat, and I sure am not letting Easter pass me by.

First step: a cardboard base held together with masking tape and staples. I'm pretty sure this method came from some distant memory of Halloween costume instructions in a Childcraft book.


I wrapped some quilt batting over it to smooth it out and tacked on some white fabric and lace from a thrifted skirt.


I made a flower from the leftover frill and a button, plus a veil cannibalized from a hand-me-down vintage hat. I tried it without the veil, but a pillbox hat with no veil makes you look like a flight attendant.


And voila, a pleasantly 60's Easter outfit. Except if it were really the 60's I would have gloves and a matching jacket as well, which is a bit much.

Saturday, March 31, 2012

Project: travel journal

I hate feeling like a tourist. So when I travel, I don't like to have my camera out a lot. During my college travels in Europe, I carried a little notebook instead and jotted or sketched. Espresso cups, men in velvet jackets, cute babies on the Metro - it all went into the notebook. I carried a little flat watercolor set with me and added color in the evenings. I also used it to keep track of the money I was spending, partly for actual financial reasons and partly as a record of the trip - I can look back through the list and remember the details.

Jeff and I will be spending some time in Quito, Ecuador later this spring. (After I bailed on the Peace Corps four years ago, I think it's about time we do some world traveling before we're too tied down.) So I wanted a notebook to take with me. Particularly because the library and internet are full of advice about traveling in Ecuador, some of which I want and most of which I don't. This I can copy into it exactly what I want.


I covered two rectangles of cardboard in some fabric from a partly-shredded silk scarf.


Next I cut three kinds of pages: watercolor paper for drawings, lined paper for listing money spent, and graph paper because I had some. I marked the covers and pages with where I wanted the holes. I could use a hole punch for the holes in the pages, but the covers needed a drill.


I bound them together with keyrings (the kind that hinge open, because the spiral kind are too much of a pain to get through the holes).

Now begins the process of writing my own travel guide: map printouts, things I want to see, addresses, flight details, the instructions for how to take anti-malarials, and so forth. While I'm there, I'll add sketches, a spending record, and notes.

Monday, January 16, 2012

Stay warm!

I try to heat the person, not the house. A big aid in this effort is the humble rice pack: a cloth bag filled with rice, which you microwave for about three minutes. Then it's ready to warm your feet, sheets, or whatever.

I've been wanting a wearable version of this: a rice scarf. Today I made one.


To make one, cut out two horseshoe or doughnut shapes from fabric. You don't want the rice to fall out, so pick fabric that isn't likely to spring holes. I used part of an old sheet. Sew around the outer edge and the two short edges but not the inner circle.


Turn your doughnut inside out so the rough edges are inside. To keep the rice from all falling to one end, sew a few seams going from the inside to the outside radially. Pour about a cup of dry rice into each pouch, then sew the inside seam shut. (You probably want to do one or two pouches at a time, so your rice doesn't fall out when you go to sew all the pouches shut.)

You can leave it like that, or you can add a cover. I made a cover out of a red scarf. And now my neck is warm.

Friday, December 23, 2011

Christmas postcards

Having exhausted my supply of decent-looking envelopes, this year I made Christmas postcards.


I recommend it as a doable way to make your own Christmas cards, as long as you don't plan to write an essay inside. Print out a bit of a carol or poem, a cut paper star or snowflake, and you're done.

Stars, keep the watch. When night is dim
One more light the bowl shall brim,
Shining beyond the frosty weather,
Bright as sun and moon together.
People, look east and sing today:
Love, the star, is on the way.


-Eleanor Farjeon

Friday, November 25, 2011

Advent calendars

In Denmark I saw Advent calendars for adults (with lotto scratch tickets behind each door), kids (with chocolate), and cats (with 24 cat treats behind paper windows). My favorite was just envelopes strung on a ribbon, which you could fill and hang on a wall.

I make these every year. You could just paper-clip mailing envelopes to ribbon, or make smaller envelopes. They're not hard to do, and people like them (especially college students who are away from home).


Ideas for filling the envelopes:
  • origami cranes or other shapes
  • chocolate coins
  • paper snowflakes
  • excerpts from poems or stories
  • hearts cut from red cloth (in Denmark, hearts are considered Christmasy for some reason.)
  • jokes
  • bags of flavored tea
  • real or paper holly leaves
  • notes marking days of the month: full moon, winter solstice, St. Lucia's day (Dec. 13), St. Nicholas's day (Dec 6), first day of Chanukah (for those of us in mixed families)
  • recipes
Here are ideas from some other calendars, some pretty ambitious.

Sunday, July 17, 2011

Skirt guard

The Dutch have it all figured out when it comes to bicycles. One bike accessory commonly seen there (though not here) is the skirt guard, designed for keeping coat tails and skirts out of your back wheel.

This week I made my own. I wear skirts most of the time, and while I've never had a skirt-in-spokes disaster they do sometimes get stuck in the back brake. Now that won't happen!


I cut two semicircles of fabric, stapled them together along part of the curve, and sewed the corners to the bike. For some reason I cut off a part at the front, but don't do that.

Saturday, May 21, 2011

Project: circle rug

Or, what to do with all the fabric your mother is never going to make into anything.

Cut fabric into long strips. You can turn the corners so it's one long strip.

Crochet into circles. Crochet the circles together. I'd never successfully crocheted anything before, but these are pretty hard to screw up.

Sunday, April 17, 2011

Adventures in millinery

Thanks to Goodwill, my housemate's hat block, silk flowers from the Carlisle dump, and fabric scraps from the neighbor's trash . . .


I am ready for any and all Easter services, graduations, and summer weddings.

Wednesday, April 13, 2011

Dig for victory

During the World Wars, governments encouraged civilians to . . . garden. And be thrifty. When was the last time you heard our government advocating either of those things?


Now, preoccupied with GDP, we are told to consume more. After 9/11, President Bush advised us to continue taking vacations at Disneyworld.

I'm not sure I love the idea of my garden as a "munition plant". And that last woman looks a little crazed (botulism, maybe?) But I love the idea of a national ethos of production and conservation rather than consumption. And I'm pleased the Obamas have followed in Eleanor Roosevelt's footsteps with a White House vegetable garden.

It's spring - time to start growing your own food! Depending on the space and interest, you may not grow every tomato you eat this summer. But it's worth it for things you want really fresh, like salad greens or herbs. Seed is so cheap! Try it!

Internet instructions like to make gardening sound easy-peasy, which it kind of is. But be realistic: your plants need good soil, good light, and enough water. Container gardens are a good place to start if you have trepidations or limited space. Better yet, make your own sub-irrigated planters. The internet will tell you most of what you need to know, and the rest you'll learn from experience.

Thursday, January 13, 2011

Two projects

Blessed with a snow day, I decided to do something about the pile of magazines on the bathroom floor.

I retrieved a pizza box from the neighbors' recycling, cut and stapled it into the size I wanted, and stapled white paper over it. Then I punched two holes in the back with a nail, took a section of wire coat hanger, and threaded it through the holes. I bent the wire up over the edge toilet tank, replaced the lid, and it was done.

But what is that lid? Why is it wooden?


Last summer, Jeff cut a new lid to the toilet tank. (The original plan was to drill a hole in a normal ceramic lid, but ceramic doesn't drill so much as shatter.) It has a corner missing, and bits of wood glued on underneath to keep it from sliding around. He also adjusted the float in the tank so it stops filling after about one gallon, leaving about a gallon's worth of empty space before the overflow pipe.


When we're waiting for the water to heat up before a shower, we catch the cold water in a milk jug with the top cut off. Then we pour the water into the toilet tank, via the missing corner on the wooden lid. If the tank is already full, the jug just waits until it's needed.


I think we've about halved the amount of water our toilet uses. Water is plentiful in our region, but it still takes resources to purify and transport that water that's going down the drain.

Wednesday, July 14, 2010

The secret garden

Remember this? It's the lot behind the post office that I adopted last year.


This is the garden now:


It's not Eden, but it's nicer than it was.

Magic

Yesterday I woke to hear the sound I had been waiting for. It sounded like someone shutting a tiny, squeaky door hinge. I knew it could only mean one thing: my quail had hatched.

For years I've wanted to keep poultry. I corresponded with the Medford animal control guy to no avail. I dreamed of the day we could move to somewhere with a yard to keep chickens in. And last month I learned a critical fact: you can keep quail indoors. They're small and quiet, and they're prolific layers.

So I ordered eighteen eggs - you really can get anything on the internet. Jeff built me an incubator, and for seventeen days I anxiously monitored the temperature and turned the eggs. I read up on quail maladies like spraddle-leg and pasty-butt (assuring Jeff that neither were contagious to humans).

I didn't entirely believe it was going to work. For one thing, our homemade incubator varied wildly in temperature. Maybe the eggs had already been baked into oblivion during shipping. Maybe the humidity was wrong, or the temperature had spiked too high. Anyway, it seemed improbable that these little rock-looking things were going to turn into animals that would breathe and run around.

That's why it was so magical at 4 am when I heard the first peeps. It was like Santa Claus had come. I knelt at the incubator and saw the four damp babies inside the incubator. They looked exhausted. Sometimes they'd get up and stagger around the incubator, but mostly they flopped down in awkward positions - on top of each other, on top of the unhatched eggs. I considered what they'd just been through: in order to be born, each chick had to break through a calcium wall. With its face. And then it was able to get up and begin walking on its siblings.

If you've never hung out with a newborn creature, I recommend it. Any way you look at it, new life is amazing. A hen in Indiana laid an egg that would go through the mail to me, develop with the aid of a lightbulb but without food or water, and three weeks later become another quail. I knew the facts, but seeing it happen is a completely different experience. Also, baby birds and mammals are designed to be attractive. Their survival depends on adults wanting to take care of them, so being cute helps them survive.


For reference, that's a juice bottle lid. The chicks are about two inches long.

Sunday, June 06, 2010

Project: self-watering planter

I'm determined that living in an apartment on the third floor without so much as a fire escape won't keep me from growing food this summer. I've commandeered a patch of wall on the sunny side of the building, and so far nobody has disturbed my plants.

The latest project was a self-watering tomato pot. Plants develop root systems better if the water is coming from below, not above. Also, when I'm away for a week, the plant will suck up water happily.

The lower pot is the reservoir. It was a regular plastic pot with holes in it, so I lined it with plastic. The PVC tube is for adding water.


The second pot has wicks to draw up water from the reservoir. I used strips of towel poked through the holes in the bottom.


The soil and plant go in the upper pot, and voila:


I fill the reservoir via the tube. As the soil dries up, the towel wicks up water from the reservoir. The plant has damp soil. Hooray!

There are tons of instructions out there for building self-watering containers. They're great for the urban garden.

Saturday, June 05, 2010

I have a business!


. . A very small one. In an effort to support my sewing habit, I'm going commercial.

http://www.etsy.com/shop/TooWholesome